General
Install PySide2
To install PySide2 (including Shiboken2 & Qt) make sure that we first activate our venv
pip install PySide2
Hello World app
Lets build a simple ui and run with sublimeText. Select the build system we just created and build Ctrl B
from PySide2 import QtCore
from PySide2 import QtWidgets
from PySide2 import QtGui

import sys
from functools import partial

class HelloWidget(QtWidgets.QWidget):

    def __init__(self, parent=None):
        super(HelloWidget, self).__init__(parent)

        self.setGeometry(400, 400, 250, 50)
        self.setWindowTitle('Hello')

        vbox = QtWidgets.QVBoxLayout(self)
        button = QtWidgets.QPushButton('Hello')
        button.clicked.connect(partial(self.speak, 'World'))
        vbox.addWidget(button)

    def speak(self, name):
        print(f'Hello {name}')


if __name__ == '__main__':

    app = QtWidgets.QApplication(sys.argv)
    w = HelloWidget()
    w.show()
    app.exec_()
Window
Example how to center a widget in the Houdini main window. This works if the main window is not full screen or if it is moved to a second monitor.
main_window = hou.qt.mainWindow()
my_widget = MyWidget()
my_widget.setParent(main_window, QtCore.Qt.Window)

pos = main_window.rect().center() - my_widget.rect().center()
my_widget.move(main_window.mapToGlobal(pos))

my_widget.show()
Flags
By setting window flags you can control how the widget is handeled. Read more on the QtCore.Qt.WindowType
- QtCore.Qt.Tool
- Indicates that the widget is a tool window. A tool window is often a small window with a smaller than usual title bar and decoration, typically used for collections of tool buttons. If there is a parent, the tool window will always be kept on top of it. If the window system supports it, a tool window can be decorated with a somewhat lighter frame. It can also be combined with Qt.FramelessWindowHint.
Note If there isn’t a parent, you may consider using Qt.WindowStaysOnTopHint as well.
- Indicates that the widget is a tool window. A tool window is often a small window with a smaller than usual title bar and decoration, typically used for collections of tool buttons. If there is a parent, the tool window will always be kept on top of it. If the window system supports it, a tool window can be decorated with a somewhat lighter frame. It can also be combined with Qt.FramelessWindowHint.
- QtCore.Qt.WindowStaysOnTopHint
- If the widget does not have a parent we can use QtCore.Qt.WindowStaysOnTopHint to force the widget top always be on top.
# to set multiple window flags you "OR" them together. To add a flag to the existing ones:

widget.setWindowFlags(widget.windowFlags() | QtCore.Qt.WindowStaysOnTopHint)

# to remove a flag "AND" it out using the flags negation:

widget.setWindowFlags(widget.windowFlags() & ~QtCore.Qt.WindowStaysOnTopHint)
print(int(w.windowFlags()))
print(bin(int(w.windowFlags())))
Menu
Action
If you want a quick way to add an action you do this:
# addAction(text, function)

menu.addAction('Doit', partial(self.doit, 'now'))
You could also provide a shortcut to the action. I have not been able to use the shortcut to actually call the function, seems to have someting to do with focus, but I have not digged to deep into this. I guess you could have it there for discoverability and then add the shortcut to the widget instead as shown below.
# addAction(text, function, QKeySequence)

menu.addAction('Doit', partial(self.doit, 'now'), QtGui.QKeySequence(QtCore.Qt.CTRL + QtCore.Qt.Key_Space))
Here we set the shortcut Ctrl + Space to do something
# QShortcut(QKeySequence, parent)

shortcut = QtWidgets.QShortcut(QtGui.QKeySequence(QtCore.Qt.CTRL + QtCore.Qt.Key_Space), self)
shortcut.activated.connect(partial(self.doit, 'now'))
Data
Clipboard
- Clipboard
- Data to clipboard
from PySide2 import QtWidgets clipboard = QtWidgets.QApplication.clipboard() clipboard.setText('Hello World!') - Get Data from clipboard
from PySide2 import QtWidgets
def get_clipboard_data():
    clipboard = QtWidgets.QApplication.clipboard()
    print(clipboard.text())

# You need an app to use use the clipboard, so if you want one while deving...

if __name__ == '__main__':

    import sys
    app = QtWidgets.QApplication(sys.argv)
    get_clipboard_data()
    app.exec_()
- Data to clipboard
Custom Painting
Style Sheets
Colored Border
Here is a way to draw a colored bottom border to your line edits. Can be handy if you want to color code them rgb / xyz (like in Houdini). Note! you need to apply the style sheet with different hex value of the third component of the border-color property.
ss = '''
QLineEdit {
    border-width: 2px;
    border-style: solid;
    border-color: #2C2C2C #2C2C2C #B33921 #000000;
    /*border-right-style:none*/;
};'''
line_edit = QtWidgets.QLineEdit()
line_edit.setStyleSheet(ss)
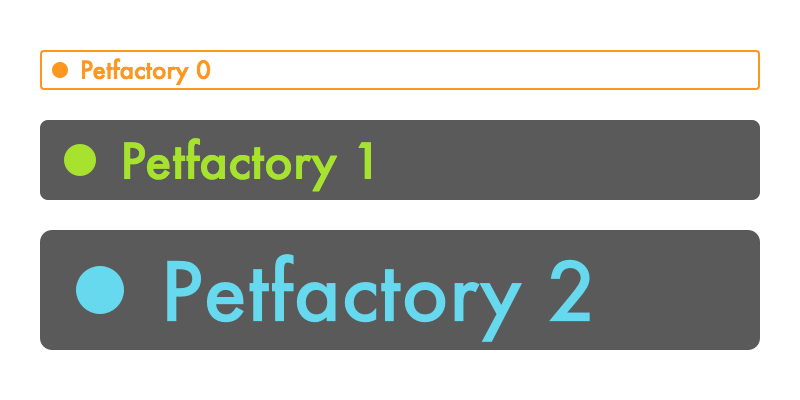
I am working on a custom widget to create a collapsable frame, like the one used in the Maya attribute editor. In this widget I have a label and an arrow to indicate the expanded/collapsed state of the widget. I wanted to learn how to implement a stylesheet to be able to set a few visual properties of the widget. Some of the properties comes for free like the background-color, border-radius, font-size and color etc. But I also wanted to be able to set the color of the arrow. The image below is an example of a simplified version of the widget.
In the article “Qt Style Sheets and Custom Painting Example” from the Qt docs if found a C++ example of how to do this. After some further googling and some trial and error I got it to work with PySide2.
Below is a simplified example of the widgets.
class DotLabel(QtWidgets.QFrame):

    def __init__(self, name, height=20, parent=None):
        super(DotLabel, self).__init__(parent)

        self._dot_color = QtGui.QColor(0, 0, 0)
        self._name = name
        self._height = height
        self.setFixedHeight(height)

    def get_dot_color(self):
        return self._dot_color

    def set_dot_color(self, color):
        self._dot_color = color

    def paintEvent(self, e):

        qp = QtGui.QPainter(self)
        qp.setRenderHint(QtGui.QPainter.Antialiasing)
        rect = QtCore.QRect(self._height, 0, self.width(), self._height)
        qp.drawText(rect, QtCore.Qt.AlignVCenter, self._name)
        qp.setBrush(self.get_dot_color())
        qp.setPen(QtCore.Qt.NoPen)
        qp.drawEllipse(QtCore.QPoint(self._height*.5, self._height*.5), self._height*.20, self._height*.20)
        qp.end()

    dotColor = QtCore.Property(QtGui.QColor, get_dot_color, set_dot_color)
And in the “main” widget.
class TestWidget(QtWidgets.QWidget):

    def __init__(self, parent=None):
        super(TestWidget, self).__init__(parent)

        self.setGeometry(100,240,400,200)

        vbox = QtWidgets.QVBoxLayout(self)

        # add widgets

        for i in range(3):

            dot = DotLabel('Petfactory {}'.format(i), 20+i*20)
            dot.setObjectName('dot_{}'.format(i))
            vbox.addWidget(dot)

        # apply stylesheet

        s_path = os.path.join(os.path.dirname(os.path.abspath(__file__)), 'stylesheet.qss')
        with open(s_path, 'r') as f:
            self.setStyleSheet(f.read())
Example from the style sheet:
DotLabel {
    font-family: "Futura";
}

DotLabel#dot_0 {
    border-radius: 2px;
    border: 1px solid rgb(253, 151, 32);
    color: rgb(253, 151, 32);
    font-size: 12px;
    qproperty-dotColor: rgb(253, 151, 32);
}

DotLabel#dot_1 {
    border-radius: 4px;
    color: rgb(166, 226, 46);
    font-size: 24px;
    qproperty-dotColor: rgb(166, 226, 46);
    background-color: rgb(90,90,90);
}

DotLabel#dot_2 {
    border-radius: 6px;
    color: rgb(102, 217, 239);
    font-size: 40px;
    qproperty-dotColor: rgb(102, 217, 239);
    background-color: rgb(90,90,90);
}
While in the research phase I came across a nice post by Dhruv Govil not exactly related, more on dynamic properties and stylesheets. There is also this article from the Qt docs
Empty Model
In a tool I am writing I have a table view in which I want to display some informative text to the user when the view is “empty” i.e. the model has no rows. My initial idea was to overlay the view with a label but this felt a bit to hacky. I ended up on a SO post that subclassed a QTableView and implemented som custom drawing in the paintEvent when the model was empty. I liked this approach and implemented that in Python. Below is some information from the PySide docs on QPainter. I wanted to understand if I needed to call the begin() and end() when I did the painting.
- class PySide.QtGui.QPainter(arg__1)
- Parameters: arg__1 – PySide.QtGui.QPaintDevice
Constructs a painter that begins painting the paint device immediately.
This constructor is convenient for short-lived painters, e.g. in a QWidget.paintEvent() and should be used only once. The constructor calls PySide.QtGui.QPainter.begin() for you and the PySide.QtGui.QPainter destructor automatically calls PySide.QtGui.QPainter.end() .
Here’s an example using PySide.QtGui.QPainter.begin() and PySide.QtGui.QPainter.end() :
def paintEvent(self, paintEvent):
    p = QPainter()
    p.begin(self)
    p.drawLine(...) # drawing code

    p.end()
The same example using this constructor:
def paintEvent(self, paintEvent):
    p = QPainter(self)
    p.drawLine(...) # drawing code
And this is the CustomTableView
class CustomTableView(QtWidgets.QTableView):

    def __init__(self, *args, **kwargs):
        super(CustomTableView, self).__init__(*args, **kwargs)
        self._text = ' Right Click to Add / Remove '

    def paintEvent(self, event):

        if self.model() and self.model().rowCount() > 0:
            super(CustomTableView, self).paintEvent(event)

        else:
            qp = QtGui.QPainter(self.viewport())
            qp.setPen(QtGui.QColor(175, 175, 175))
            rect = QtCore.QRect(qp.fontMetrics().boundingRect(self._text))
            rect.moveCenter(self.viewport().rect().center())
            qp.drawText(rect, QtCore.Qt.AlignCenter, self._text)
Layout
QFormLayout
Add a spacers to a form Layout
form_layout = QtWidgets.QFormLayout(self)
form_layout.setLabelAlignment((QtCore.Qt.AlignRight | QtCore.Qt.AlignVCenter))
# form_layout.setHorizontalSpacing(10)

# form_layout.setVerticalSpacing(10)

form_layout.addRow('Label 0', QtWidgets.QLabel('Zero'))

spacer = QtWidgets.QSpacerItem(0, 40)
form_layout.setItem(form_layout.rowCount(), QtWidgets.QFormLayout.SpanningRole, spacer)

form_layout.addRow('Label 1', QtWidgets.QLabel('One'))

spacer = QtWidgets.QSpacerItem(0, 0, vData=QtWidgets.QSizePolicy.Expanding)
form_layout.setItem(form_layout.rowCount(), QtWidgets.QFormLayout.SpanningRole, spacer)

form_layout.addRow('Label 2', QtWidgets.QLabel('Two'))
Get the label of a form layout
label_0 = form_layout.itemAt(0, QtWidgets.QFormLayout.LabelRole).widget()
label_0.setToolTip('Hello World!')

label_1 = form_layout.itemAt(form_layout.rowCount(), QtWidgets.QFormLayout.LabelRole).widget()
label_1.setToolTip('Hello World!')
Model
Set the first item of a combobox to checked.
# when the itmne is added to the model...


for name in ['Hello', 'world']:
    item = QtGui.QStandardItem(name)
    item.setCheckable(True)
    item.setFlags(QtCore.Qt.ItemIsEnabled | QtCore.Qt.ItemIsUserCheckable)
    model.appendRow(item)

# then we can set it ike

model = self.my_combobox.model()
index = model.index(0, 0)
model.setData(index, QtCore.Qt.Checked, QtCore.Qt.CheckStateRole)
View
Spacer & Alignment
Make the label field of a QFormLayout to a speific with
spacer = QtWidgets.QSpacerItem(100, 0, QtWidgets.QSizePolicy.Fixed)
form_layout.setItem(form_layout.rowCount(), QtWidgets.QFormLayout.LabelRole, spacer)
hbox = QtWidgets.QHBoxLayout()
form_layout.addRow('Hello', hbox)

self.my_cb = QtWidgets.QCheckBox('Enable')
hbox.addWidget(self.my_cb, stretch=0, alignment=QtCore.Qt.AlignLeft) # align to the left, do not allow to stretch

hbox.addSpacerItem(QtWidgets.QSpacerItem(10, 0, QtWidgets.QSizePolicy.Fixed)) # add spacer after the cd


self.actor_type_cb = QtWidgets.QComboBox()
self.actor_type_cb.setMaximumWidth(150)
hbox.addWidget(self.actor_type_cb, stretch=1, alignment=QtCore.Qt.AlignLeft) # align to the left, allow to stretch
QTreeView
- Set Selection
- Select a row
self.tree_view.clearSelection() bottom_right_index = top_left_index.sibling(top_left_index.row(), last_col) selection = QtCore.QItemSelection(top_left_index, bottom_right_index) self.tree_view.selectionModel().select(selection, QtCore.QItemSelectionModel.Select) - Select index
self.tree_view.clearSelection()
self.tree_view.selectionModel().setCurrentIndex(index, QtCore.QItemSelectionModel.Select)
- Select a row
Misc
Get the center of the display
# get the available screens

screens = QtGui.QGuiApplication.screens()
# print the center of the first screen

screens[0].geometry().center()
Visual properties
view.setColumnWidth(0, 200)
Drag & Drop
from PySide2 import QtGui
from PySide2 import QtCore
from PySide2 import QtWidgets

class MaterialTableView(QtWidgets.QTableView):

    def __init__(self, parent=None):
        super(MaterialTableView, self).__init__(parent)

    def mousePressEvent(self, event):

        q_index = self.indexAt(event.pos())
        self.data = None
        if q_index.isValid():
            self.data = self.model().index(q_index.row(), 0).data()

        super().mousePressEvent(event)


    def mouseMoveEvent(self, event):

        if not self.data:
            return

        mimeData = QtCore.QMimeData()
        mimeData.setText(self.data)
        drag = QtGui.QDrag(self)
        drag.setMimeData(mimeData)
        drag.exec_(QtCore.Qt.CopyAction | QtCore.Qt.MoveAction, QtCore.Qt.CopyAction)


class MeshTreeView(QtWidgets.QTreeView):

    def __init__(self, parent=None):
        super(MeshTreeView, self).__init__(parent)
        self.setAcceptDrops(True)

    def dragEnterEvent(self, event):
        event.accept()

    def dragMoveEvent(self, event):
        event.accept()

    def dropEvent(self, event):

        q_index = self.indexAt(event.pos())
        if q_index.isValid():
            print('valid')

        mime_data = event.mimeData()
        if mime_data.hasText():
            print(mime_data.text())
Icons
- Remove the blue-tinted highlight of selected icons
- One way to get rid of the blue tint of selected icons (for instance in a QListView) is to explicitly set the icon of the selected state (as well as the normal). You can assign the same pixmap or create different sizes, colors or whatever you need.
pixmap_normal = create_your_pixmap(size)
pixmap_selected = create_your_pixmap(size)

icon = QtGui.QIcon()

icon.addPixmap(pixmap_normal, QtGui.QIcon.Normal, QtGui.QIcon.On)
icon.addPixmap(pixmap_selected, QtGui.QIcon.Selected, QtGui.QIcon.Off)

my_item.setIcon(icon)
Size
Set the view to resize to fill space
self.splitter = QtWidgets.QSplitter()
self.splitter.setOrientation(QtCore.Qt.Horizontal)
self.splitter.setSizePolicy(QtWidgets.QSizePolicy.Minimum, QtWidgets.QSizePolicy.Expanding)
vbox.addWidget(self.splitter)
QStandardItem
To make an item checkable but not editable using flags
item.setCheckable(True)
item.setFlags(QtCore.Qt.ItemIsEnabled | QtCore.Qt.ItemIsUserCheckable)
Check the model if an index is checked
checked = True if index.data(QtCore.Qt.CheckStateRole) == QtCore.Qt.Checked else False
Events
Focus
If you want to do something when the widget gets/loses focus you can implement the focusIn/out event.
Note that the widget needs to setFocusPolicy() to something other than Qt.NoFocus in order to receive focus events.
self.setFocusPolicy(QtCore.Qt.ClickFocus)

def focusOutEvent(self, event):
    super().focusOutEvent(event)
    print('focus out')

def focusInEvent(self, event):
    super().focusInEvent(event)
    print('focus in')
Widgets
QInputDialog
name, ok = QtWidgets.QInputDialog.getText(self, 'Name', 'label')
if ok and name:
    print(name)
Promt to continue
def continue_dialog(parent, text, info, min_width=400):

    msg_box = QtWidgets.QMessageBox(parent)
    msg_box.setText(text)
    msg_box.setInformativeText(info)
    msg_box.setStandardButtons(QtWidgets.QMessageBox.Ok | QtWidgets.QMessageBox.Cancel)

    msg_box.setDefaultButton(QtWidgets.QMessageBox.Ok)
    msg_box.setStyleSheet(f'QLabel{{min-width: {min_width}px;}}')

    return msg_box.exec_() == QtWidgets.QMessageBox.Ok
Signal & Slot
Chaining signals
Or mayabe signal forwarding? Lets say we have a widget (the “parent”) that has a widget (the “child”) which in turn have a widget (the “grandchild”). If we interact with this “grandchild” widget and emit a signal we might want the signal to reach the top “parent” widget. What I have done before is to emit a signal from the “grandchild” connect it to a slot in the “child” and there emit a new signal and connect it to a slot in the parent. This works but you can also connect a signal to a signal creating a chain of signals. Below is a snippet from the qt docs on Signal & Slots
It is even possible to connect a signal directly to another signal. (This will emit the second signal immediately whenever the first is emitted.)
Below is a simple example of how this works:
import sys
from functools import partial

from PySide2 import QtWidgets
from PySide2 import QtCore
from PySide2 import QtGui

class GrandChildWidget(QtWidgets.QWidget):

    notify = QtCore.Signal(str, int)

    def __init__(self, parent=None):
        super(GrandChildWidget, self).__init__(parent)

        vbox = QtWidgets.QVBoxLayout(self)
        btn = QtWidgets.QPushButton('Test')
        btn.clicked.connect(partial(self.notify.emit, 'Hello World!', 42))
        vbox.addWidget(btn)

class ChildWidget(QtWidgets.QWidget):

    notify = QtCore.Signal(str, int)

    def __init__(self, parent=None):
        super(ChildWidget, self).__init__(parent)

        vbox = QtWidgets.QVBoxLayout(self)
        grand_child_widget = GrandChildWidget()
        grand_child_widget.notify.connect(self.notify)
        vbox.addWidget(grand_child_widget)

class ParentWidget(QtWidgets.QWidget):

    def __init__(self, parent=None):
        super(ParentWidget, self).__init__(parent)

        vbox = QtWidgets.QVBoxLayout(self)
        child_widget = ChildWidget()
        child_widget.notify.connect(self.notify_slot)
        vbox.addWidget(child_widget)

    def notify_slot(self, message, value):
        print(f'{message=}, {value=}')

if __name__ == '__main__':

    app = QtWidgets.QApplication(sys.argv)
    w = ParentWidget()
    w.show()
    app.exec_()
Additional arguments
Lets say that you are emitting a signal from a custom QMenu. You are recieving the signal in a QTreeView, and here you want to add some additional arguments and emit another signal that can be recieved in a parent widget. One thing that tripped me up was in which order the arguments gets processed in the slot in the QTreeView.
# we emit a signal from the QMenu

self.something.emit(A_arg, B_arg)

# we handle it in the QTreeView

menu.something.connect(partial(self.something_handler, C_arg))

# note that the C arg gets sent to the handler as the first arg

def something_handler(self, C_arg, A_arg, B_arg):
Stylesheets & Resources
Compile .qrc
icons.qrc
<RCC version="1.0">
<qresource>
    <file>petfactory_bookmark.svg</file>
</qresource>
</RCC>
- To compile a qrc file
- Activate the venv that has PySide2 installed
- You can RMB click on the venv dir > Open Git Bash here
- Then cd to the project dir where you have your resources
- Compile the icons.qrc:
- pyside2-rcc icons.qrc -o icons.py
- Activate the venv that has PySide2 installed